Well now that we know that filming has started in Peter Jackson's The Hobbit attention will no doubt turn to all things Hobbit related. GW have been confirmed as having their Lord of the Rings licence extended by the Tolkien Estate so no doubt lots of lovely models will be coming out to tie in with the release of the films (we know it's going to be in 2 parts).
Of course Dear Reader, you may already be aware of the set released by GW sometime ago The Battle of Five Armies which I understand is based on the Warmaster system and uses 10mm figures. I have not played it but GordonY and Ruarok have had a couple of games
But these ramblings are not about that, but about a Board Game.

The Battle of Five Armies (or BoFA for short)was released by a company called Iron Crown Enterprises (ICE) back in 1984. ICE had the licence from the Tolkien Estate to produce board games based on the Tolkien novels as well as the highly acclaimed Middle Earth Role Playing system (MERP). I never got into MERP, despite it's obvious appeal but BoFA became a big favourite very quickly.
BoFA recreates the climactic battle that takes place at the end of the Hobbit. The battle itself only commands 5 pages of the novel but enough detail was given by Tolkien for ICE to make a stab at producing a game.
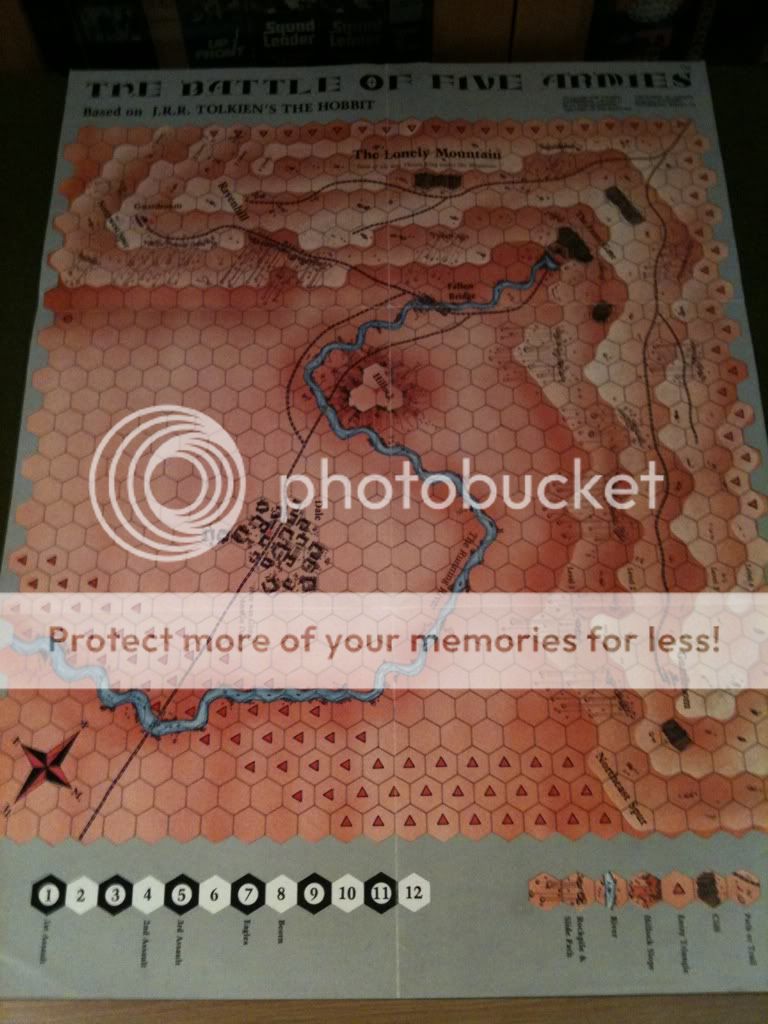
The map depicting the northwest and northeastern spurs of the Lonely Mountain, the plain around Dale and the Running River.
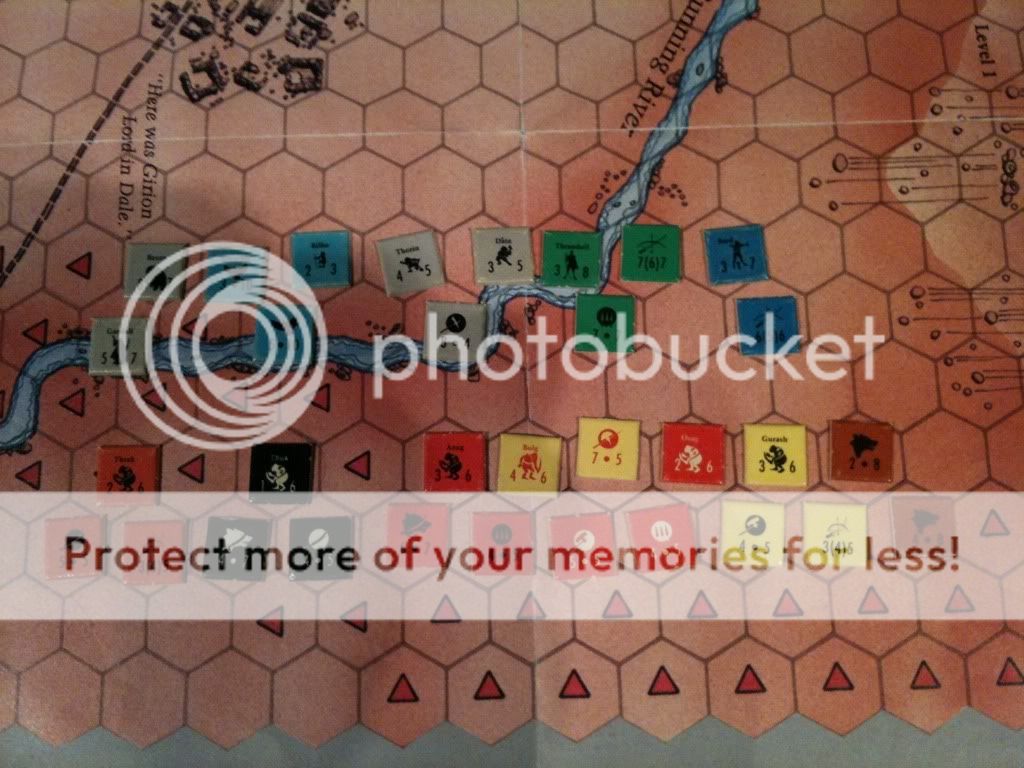

The protagonists - Along the top you have the Forces of the Free Peoples, which include Gandalf, Beorn, Gwaihir, Lord of the Eagles, Eagles, Bilbo, Dain II, Dwarves, Thorin, Thranduil, Elvish Spear, Elvish Archers, Bard and Men of Esgaroth.
Below them are ranked the Forces of Evil, which included 5 Goblin tribes, belonging to Thrak and Thuk (for some reason his name was never used by us when playing the game - instead a similar sounding word was used....), Osag, Gurash the Great, Azug the Vast and the Goblin King, Bolg, along with a horde of Wargs and Wolves.
The counters were easy to read and understand, the left hand figure being the unit (or characters) combat value and the right hand figure was it's movement allowance. Archer units had an additional figure which was their Bow Factor, which determined their range and strength, so if a unit had a Bow factor of 6 then at range 6 it's strength was 1, range 5 it's strength was 2 and so on until at range 1 it's strength was 6.
Most counters were double sided as an adverse Combat result would result in a step loss and the unit would be flipped over on to it's reverse side which had reduced strength (usually half the original strength of the unit) so normally a unit losing 2 steps would be elimnated. Characters were treated slightly differently in that their strength was equivalent to the number of step losses they could take and little chits would help keep track of these.
The key to winning the game was the control of victory areas. These were Dale, the Front Gate, the Hillock and the 2 Guardrooms, 1 on each spur of the mountain. At the end of the game, the player with control of the majority of areas won the game - Dale and the Hillock were treated slightly differently from the other areas which were only 1 hex in size, in that as Dale and the Hillock were several hexes in size, a player was deemed to control these areas if the strength of his units occupying these areas was more then double the enemy player.
The unique aspect about BoFA for it's time was that it although it was an IGO-UGO game, you did not have complete freedom to decide what your units did during your turn. Instead you had to pick an action chit

But of course, it wasn't quite as simple as that. The player going first that turn (the Evil Player going first in all odd numbered turns and the Free Peoples player going first in all even numbered turns) has free choice of which chit to pick as his first action of that turn, from either MOVE, FIRE, COMBAT or F/C (FIRE OR COMBAT). The other player would then pick a chit that he would use later in the turn, with the proviso that it could not be played immediately after the First Player's first Chit pick. After that, the Chits were picked randomly, until all of the available Chits for that turn had been played. In turns 1-3 there were 6 chits in the Chit pool and a maximum of 4 Chits could be played and on turns 4-12 there would be 8 chits in the pool with a maximum of 6 Chits being played. So as an example, on Turn 3, if the Evil Player picked a MOVE chit as his first action (and say the Free Peoples player picked a COMBAT Chit for use later in the turn), the Evil Player would move all, some or none of his units, then the Free Peoples player, as their first action of the turn, would have to randomly pick a chit from the Chit pool. The Evil Player, would then randomly pick a chit from the pool and then the Free Peoples player having the right to play the 4th and last Chit for that turn could either play the Chit he selected at the start of the turn or he could randomly pick a Chit from the pool.
So immediately, you were forced into thinking ahead of what you would want to do (but may not be able to do, if you didn't pick the right Chit). It meant you would have to plan your moves and then hope, for example, that the other player would not pull a move Chit on his turn and move away from all your units - as there are no "Zones of Control" units can move away from an Enemy Unit without penalty. However, as Combat was mandatory, if the enemy player, in his turn, had to play a Combat chit, then your careful planning could hopefully pay off, if the enemy player then had to attack at an unfavourable combat differential.
Many a time a player would curse the pick of the FIRE chit when he had no Archer units left to use it with! Also as each player, on certain turns of the game, could expect reinforcements, it was usually good idea to make sure you had a move chit for that turn so that the reinforcements would actually get on the map!
There were 2 types of Combat - there was Assault where you totalled up all the Strength Factors of the opposing units adjacent to each other and the phasing player then rolled a D10 and depending on the differential between the 2 totals, the cross referenced score on the Combat table would result either in no effect, step loss(es) for the defender, step loss(es) for the attacker, or sometimes step loss(es) for them both. The type of units involved could result in modifiers to the die total, for example, a Spear unit assaulting a non-Spear unit would get plus 1 to the die roll.
Then there was melee - this was when a unit moved into the same hex as an enemy unit. The unit deemed to be the attacker that phase could call on the support of one other unit in an adjacent hex and the result was again worked out in the same fashion as an Assault, with again some units (namely non Spear/ bow Goblin units and also Beorn) getting modifiers to the die roll when they instigated a melee.
The rules were split into basic rules and standard rules but to be honest we never bothered with the basic rules and just plunged into the standard rules. This brought added flavour to the basic rules, so for example, at the start of each turn, the player due to go first that turn had the opportunity to try and recover step losses for those units which had been flipped over to its reduced strength side. Morale checks would require to be taken if a unit wanted to melee an enemy unit on a higher elevation - Goblins if they wanted to melee an Elvish unit and so on.
In Combat, Eagles could make swooping attacks which involved the Free Peoples player picking up the counter of the unit being attacked by the Eagle, flip it up into the air and if it landed on it's reduced side, the unit suffered a step loss. Needless to say some of us were a bit more enthusiastic about flipping the counter into the air than others.
Rolling rock attacks could be made at certain points on the map, if an enemy unit was deemed to be in the path of a rolling rock then it could suffer a step loss.
And in the Standard game, Gandalf, got some spells to use - there were 3 to choose from and he could use a maximum of 2 which was a real pain and there were always plenty of times you could do with Gandalf firing off a spell but you had to hang on to it as you were hoping for a better opportunity to use it arising later on in the game.
Then there were optional rules you could use in the game. One that became a default rule was that the Evil Player could use "Bat Attacks" during a Fire Chit phase. It could only be used against units that were already half strength but could be extremely annoying if the Evil Player was rolling hot on his dice (1-3 on the D10). Another commonly used optional rule was to let Goblins stack with Wolf Counters thus effectively making them Warg Riders (some of the tribes had Warg Riders already in the counter mix).
I have played the game many times over the years (although sadly not recently- Note to Cammie/ Ruarok we must start playing more board games you can play this one with 3 players, at a push) and they were always tightly contested affairs. The Evil Player starts with a large numerical advantage, which gets even bigger when the 2 Goblin tribe reinforcements arrive on Turn 4 and Bolg arrives on Turn 5. Dale is usually captured fairly easily and then there is a push on to the Hillock. A fierce battle usually rages around the Guardroom on the Northeastern spur on the mountain, usually occupied by Dain and his Dwarves, being the one closest to the Evil Player's starting position. The Free Peoples player is quite often faced with a dilemma of whether to move the Elvish forces down off their spur of the Mountain, to try and contest the Hillock and Dale itself, while at the same time being aware of the possibility of another Goblin tribe coming over the top of the spur and thus looking to capture the Guardroom on that side of the Mountain.
The Front Gate is an extremely tough nut for the Evil Player to capture, particulary while Thorin and his Companions occupy the hex, but, and again using an optional rule which became the norm in our games, if Thorin leaves the Front Gate this gives all Free Peoples attacks on the following turn a positive column shift to the Combat Table, so the timing of this can be key and if badly judged could give the Evil Player the chance to sneak into the Front Gate hex.
Quite often, the game will be decided on the last turn of the game as each player tries to flood Dale and the Hillock with their units to gain the strength advantage required to claim it as theirs. I have seen the Dwarves die to the last Dwarf, as they battle to hold the Guardhouse and I have seen Beorn rush into the battle and not be able to punch his way out of a paper bag. Gandalf casting his "move away" spell and forcing a pile of Goblin counters to recoil into the Running River (as Goblins are adverse to water this immediately drowns them). And Thorin charging out of the Front Gate, only to forget to go back in again, thus allowing a Goblin unit to sneak in and keep Thorin out of the area for the rest of the game.
An excellent game, and although long out of print it still appears from time to time on Ebay. But perhaps with the new film, another games company (ICE having gone out of business a long time ago) might take up the mantle and re-print it, or perhaps bring out their own version of the Battle, in which case I would definitely be interested in getting it to see if it is half as good as BoFA.
No comments:
Post a Comment